

Choosing the right “hat” for your building will depend on several factors, such as wall layout, ceiling type, and architectural features. Even though roof trusses are more commonly used than rafters, they do not provide the same versatility and space for creativity that rafters allow.
In any structural design project, the importance of roof rafters cannot be overstated. Rafters play a crucial role in supporting the roof, distributing its weight evenly, and ensuring the overall stability and integrity of the structure. They are essential components that provide strength and support to the roof system.
In this article, we will explore the definition, function, and various types of roof rafters, including their unique features and applications. We will also discuss different materials used for rafters, such as wood, steel, and cold-formed steel, along with practical tips for rafter design and analysis.
So, grab your hard hats, dust off your drafting pencils, and let’s raise the roof, both literally and figuratively.
Definition and Function of Rafters
Picture this: you're standing beneath a roof, admiring its structure. But have you ever wondered how it stays up there without crashing down like a house of cards?
That’s when rafters come into play. Rafters are structural elements that form the framework of a roof. They are inclined beams that extend from the ridge of the roof to the eaves and support the roof covering material, such as shingles or tiles.

Figure 1: An example of exposed timber rafters landing on a lintel.
The primary function of rafters is to transfer the weight of the roof to the walls or other load-bearing elements of the structure. By distributing the load evenly, rafters ensure that the structure remains stable and can withstand various external forces, such as wind and snow loads.
Types of Rafters
The specific design and configuration of rafters will depend on factors such as roof’s shape, slope and the structural requirements of the building. A few examples of the types of rafters used in construction are listed below.

Figure 2: Common rafter types of a house roof framing.
Common Rafters
Common rafters are the main load-bearing members in a roof system. They extend from the ridge to the wall plate and are typically evenly spaced along the roof's length. Common rafters form the basic framework upon which other types of rafters are installed.
Hip Rafters
Hip rafters are diagonal members that connect the corners of a roof to the ridge. They provide support and stability to the roof's hips (external angles formed by the intersection of two roof surfaces). Hip rafters are commonly used in hipped roofs and are essential for distributing the load from the roof to the walls.
Valley Rafters
Valley rafters are inclined members that run along the internal angles formed by the intersection of two roof surfaces. They join the ridge to the eaves and help support the weight of the roof in these critical areas.
Jack Rafters
Jack rafters are shorter, inclined members that connect the common rafters to the hip or valley rafters. They provide additional support to the roof and help distribute the load evenly.
Portal Frame Rafters
Portal frame rafters are structural members within a portal frame system. It serves as the primary load-bearing element that spans between columns, providing support to the roof as well as lateral stability. They are crucial components in constructing portal frame buildings, which are widely used in commercial, industrial, and agricultural applications.

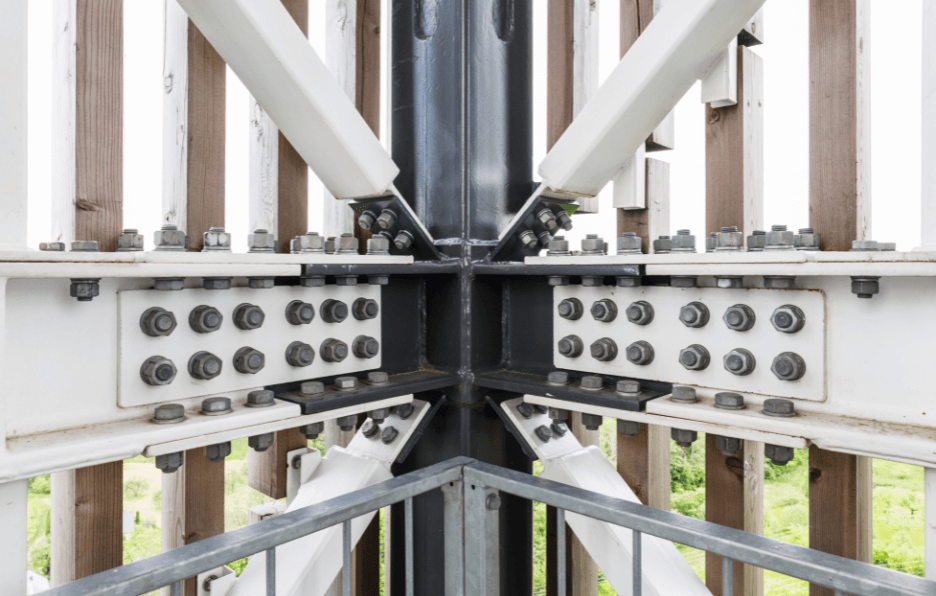
Figure 3: Commercial portal frame building.
Different Materials for Roof Rafters
Wood Rafters
Wood rafters have been widely used in construction for their strength, durability, and ease of installation.
They are commonly made of dimensional lumber or engineered wood products. Wood rafters are suitable for most residential and light commercial applications and are often preferred for their aesthetic appeal.
Steel Rafters
Steel rafters offer exceptional strength and durability. They are typically fabricated from structural steel sections and are known for their high load-carrying capacity.
Steel rafters are commonly used in larger structures, such as commercial buildings and industrial facilities, where longer spans and heavier loads are required.
Cold-Formed Steel Rafters
Cold-formed steel rafters are made from thin-gauge steel sheets that are bent or rolled into the desired shape.
They are lightweight yet strong, making them suitable for both residential and light commercial projects. Cold-formed steel rafters are particularly advantageous when longer spans or unique roof designs are necessary.
Structural Analysis Systems of typical rafters
The two most common types of residential roof frames using rafters are the ridge beam system and the collar tie system. The former refers to inclined rafters extending from a ridge beam to the wall plates. The latter consists of inclined rafters extending from a ridge board to the wall plates and tied together by a collar tie beam.
Another popular choice in commercial applications is the portal frame system, which consists of a rigid frame connecting rafters to columns with moment-resisting connections.
Ridge beam system:
A ridge beam is a structural element that performs a load-bearing function in addition to its role as a connecting point for the upper ends of the rafters. Unlike a ridge board, a ridge beam is designed to support the weight of the roof and transfer it to the supporting walls and columns.
Ridge beams are typically constructed of larger, solid dimensional lumber or engineered wood products. You will see this system in many houses with cathedral or vaulted ceilings.

Figure 4: An example of a ridge beam system.
Structural assessment of a Ridge beam system
The process of assessing and evaluating the behavior and performance of a structure under various loads and conditions starts with a simple free-body diagram. Figure 5 shows the ridge beam represented by a pinned support and the walls or beams represented by roller support.

Figure 5: Free body diagram of the roof framing.
Designing a wood rafter involves several steps to ensure its structural adequacy and performance.
The following steps outline a general approach to designing a rafter:
1. Determine Loads:
Determine the different loads that the rafter will be subjected to, including dead loads (weight of the roof materials), live loads, snow loads, and any other applicable loads, such as wind loads. Consult the local building codes or relevant standards to obtain the design loads specific to your location.

Figure 6: An example of loading diagram in ClearCalcs.
2. Load Combinations:
Combine the different loads using appropriate load combinations specified in the building codes or standards. Load combinations consider various load scenarios to ensure that the rafter is designed to withstand the most critical conditions.
3. Analysis:
Perform a structural analysis of the rafter to determine the internal forces and moments it will experience under the applied loads. This analysis involves calculating the bending moments, shear forces, and axial forces along the length of the rafter. Consider the span, roof slope, and any additional design constraints.
![[BLOG] bending-moment-shear-force-diagram.png](https://cdn.prod.website-files.com/67189a2b26762b3b096e3184/673d80dfeea5630789e7204d_BLOG_bending_moment_shear_force_diagram_0c1dbb7568.png)
4. Deflection Analysis:
Evaluate the deflection limits for the rafter to ensure it meets the required serviceability criteria. Calculate the deflections considering both immediate and long-term effects, including creep and shrinkage of wood. If necessary, modify the rafter size or incorporate additional supports to limit deflections.

Figure 8: An example of deflection diagram.
5. Rafter Sizing:
Based on the internal forces obtained from the analysis, select an appropriate wood species and grade that can withstand the anticipated loads. Use engineering design tables or software to determine the required cross-sectional dimensions (width and depth).
6. Connection Design:
Design the connections between the rafter and other structural elements, such as the ridge beam, ceiling joists, and supporting walls. Ensure that the connections can transfer the forces efficiently while maintaining the overall stability of the roof system. Don’t forget the tie-down connection for uplift forces. 😊
7. Check for Code Compliance:
Verify that the rafter design complies with the applicable building codes, standards, and regulations. Ensure that all relevant design requirements, safety factors, and load combinations are met.
Wood rafters can be quickly and accurately designed in ClearCalcs, as shown in this video.
Collar tie system:
The collar tie system has the upper ends of the rafters connected by a ridge board, which does not have a load-bearing function. Ideally, this structural system utilizes two horizontal beams called Collar and Rafter ties.

Figure 9: Carport roof rafters with collar ties.
Downward forces will cause the rafters to spread apart and push the walls. A rafter tie will prevent this from happening and hold the rafters at their original position. A tie located in the bottom third of the roof is most efficient in this scenario. Ceiling joists are quite often used as rafter ties in residential projects.

Figure 10: Gravity load will try to push the walls apart.
Wind can create substantial upward pressure on the roof, attempting to split apart at the ridge. Collar ties help counteract this uplift force by connecting opposing rafters and forming a triangular bracing system. A tie located in the top third of the roof is most efficient in this scenario.

Figure 11: Uplift forces will try to separate the rafters at the ridge.
Structural assessment of a Collar tie system
To ensure the structural integrity, safety, and performance of the design, engineers will determine the loads acting on the structure, analyze the internal forces and moments, and assess the deflection and displacement of the structure.
Figure 12 shows the free-body diagram for a collar tie roof framing. The walls or beams on the left are represented as a pinned support, and the walls or beams on the right as a roller support.
Note that we do not have a ridge beam support as the ridge board does not have a load-bearing function.

Figure 12: Free body diagram of the roof framing with collar ties.
The collar tie system is most efficient with the two ties present. However, it is common to see only one tie present in architecturally designed roofs, as shown in Figure 9.
The following images will illustrate the behavior of this structural system under upward and downward forces for various scenarios. The numbers used in these examples are for comparison purposes only.
1 - Tie located at the rafter center:

Figure 13: Downward forces shown on the left. Upward forces show on the right.

Figure 14: BMD for downward forces shown on the left. BMD for upward forces show on the right.

Figure 15: Displacement for downward forces shown on the left. Displacement for upward forces show on the right.
2 – Ties located within the bottom third of the roof:

Figure 16: Downward forces shown on the left. Upward forces show on the right.

Figure 17: BMD for downward forces shown on the left. BMD for upward forces show on the right.

Figure 18: Displacement for downward forces shown on the left. Displacement for upward forces show on the right.
Notice that by lowering the position of the collar tie, the bending moment has been reduced by 40% and lateral displacement by 70%.
If, for any architectural reason, the collar tie must be placed closer to the ridge of the roof, the stiffness of the rafters will have to be largely increased.
3 – Collar tie and rafter tie present:

Figure 19: Downward forces shown on the left. Upward forces show on the right.

Figure 20: BMD for downward forces shown on the left. BMD for upward forces show on the right.

Figure 21: Displacement for downward forces shown on the left. Displacement for upward forces shown on the right.
Now you can see why having a collar tie and a rafter tie is so efficient. 😊
A simpler way to analyze and design this structure is by using an advanced beam analysis model with oriented roller supports. ClearCalcs calculator tool Wood Roof Tie handles this task easily by looking at a single rafter in isolation.

Figure 22: ClearCalcs dynamic diagram inside the Wood Roof Tie calculator.
Portal frame system:
A portal frame is a structural system commonly used in commercial and industrial applications. It consists of rigid frames that form the primary support structure of a building, typically comprising columns and rafters connected by moment-resisting connections. The portal frame system is designed to withstand and distribute loads, providing stability and strength to the structure. It is a popular choice for various building types, including industrial warehouses, commercial buildings, and agricultural structures.
Bending Moment Diagram of a Portal Frame System
When designing a portal frame rafter, there are several key factors you need to consider, such as bending moment, shear forces, deflections, overall stability, and lateral stability. When a lateral load is applied to a portal frame, such as wind load, it creates bending moments in the members of the frame.
Figure 23 shows the bending moment diagram for a 500lb point load at the top of the left column using Robot and the ClearCals Portal Frame Analysis Wizard.
![[BLOG] bending-moment-portal-frames-1.png](https://cdn.prod.website-files.com/67189a2b26762b3b096e3184/673d80e0eea5630789e7209c_BLOG_bending_moment_portal_frames_1_0d01589d47.png)
![[BLOG] bending-moment-portal-frames-2.png](https://cdn.prod.website-files.com/67189a2b26762b3b096e3184/673d80dfeea5630789e72069_BLOG_bending_moment_portal_frames_2_2a95113336.png)
Figure 23: Bending moment diagram for a point load.
ClearCalcs Portal Frame Analysis Wizard can easily determine support reactions, bending moment, shear and axial forces, and deflection for several frame shapes in a matter of seconds.
Practical Tips for Rafter Design and Analysis
When designing and analyzing roof rafters for residential and light commercial structural projects, it is essential to adhere to the International Building Code 2021 requirements.
Here are some practical tips to follow for rafter design and analysis, considering structural, energy, and fire regulations:
Structural Design Considerations:
- Determine the required spacing and size of rafters based on the anticipated roof loads, including dead loads (roofing material, insulation) and live loads (snow, wind).
- Consider the span of the rafters and select an appropriate material (wood, steel, or cold-formed steel) based on the desired strength, load-carrying capacity, and structural requirements.
- Incorporate appropriate connections, such as hangers or brackets, to ensure proper load transfer between the rafters and other structural elements.
- Follow the building code's guidelines for fastening and bracing requirements to ensure structural stability and resistance to lateral forces.
Energy Efficiency:
- Insulation is a critical aspect of energy efficiency. Ensure that the roof design allows for proper insulation installation, reducing heat transfer and minimizing energy consumption.
- Consider the building code's requirements for minimum insulation levels and the use of continuous insulation to enhance the thermal performance of the roof system.
- Incorporate proper ventilation design to prevent moisture build-up, which can affect the performance of insulation and lead to potential issues such as mold growth.
Fire Regulations:
- Familiarize yourself with the building code's fire regulations concerning roof assemblies. This includes the use of fire-resistant materials for the roof covering, such as Class A-rated shingles or tiles.
- Ensure that any penetrations through the roof, such as chimneys or skylights, comply with fire safety requirements and are properly sealed to maintain fire resistance.
- Consider the use of fire-resistant coatings or treatments for wood rafters to enhance their fire performance.
Conclusion
Roof rafters are fundamental components in structural design projects, providing support, stability, and load distribution for the roof system.
Understanding the different types of rafters of roof systems allows designers to create robust and efficient roof structures. Moreover, selecting the appropriate material, whether wood, steel, or cold-formed steel, ensures the rafter system meets the project's specific requirements. Adhering to the International Building Code 2021 and its regulations for structural design, energy efficiency, and fire safety is paramount to ensure compliance and the long-term performance of the roof.
By considering these key factors and following best practices, architects and engineers can create safe, durable, and efficient roof systems for residential and commercial structures.
Seismic Retrofit Series: URM Insights for US and Canada Engineers
August 5th at 1 pm Eastern Time (ET)
Save your spot →Written by:

Gabriel Ribeiro, PE
.svg)
Reviewed by:


.png)
