Calcs CAD Plugin
How to Use the CalcsCAD Automatic Framing Tool
How to Use the CalcsCAD Automatic Framing Tool
The ClearCalcs CalcsCAD plugin allows engineers to quickly produce accurate and cost-effective residential framing computations in a fraction of the usual time. With the easy to use CAD plugin, simply tag the roof outline, walls, beams, and studs, and the CalcsCAD plugin will automatically determine tributary areas and loads, as well as create and automatically size all framing members in ClearCalcs.
This article details step by step instructions for how to draft a single and multi storey home using the CalcsCAD plugin. See our quick command reference guide for a brief overview of each command’s function.

 |Properties
CC:PROPS|Displays the Properties pop up panel which allows the properties of a given selected object to be viewed and changed. If an object is selected that has no ClearCalcs properties associated, the panel will be blank.|
N.B. BricsCAD v18 does not support in ribbon drop downs, so the only way to change the active and ghost layer is to do so via the Plan Layers pop up panel (below).
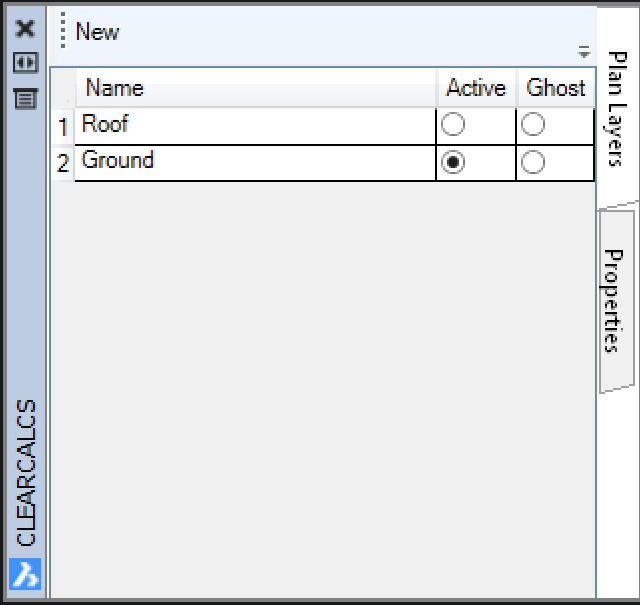 Alignment Points
Alignment points are used by the CalcsCAD plugin to line up the various levels of a multi-storey structure so they sit on top of each other correctly when calculating loads, and to enable our Ghost layer function which allows you to overlay a semi-transparent copy of another level for easy checking.
You must add one Alignment Point per Plan Layer - for example, you may wish to tag the top left corner of each level.
 Relevant Commands
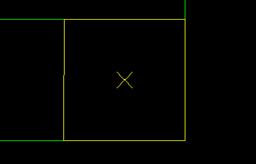 Columns must be connected to a beam, wall, or truss (i.e. they cannot be on their own). You can select and move a column if needed, or delete if unnecessary.
Tip: You can change the point style (for example, making it look like a X) in your CAD program by typing PSTYLE in AutoCAD or PDMODE in BricsCAD and then specifying the new style you’d like.
Relevant Commands
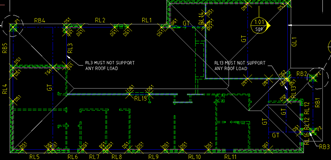 The external wall must be one continuous line (otherwise your house would have a hole in it!), however internal load bearing walls and beams can be disconnected. If a line is disconnected, you must select the disconnected segment and tick “Allow Disconnect” in the properties panel.
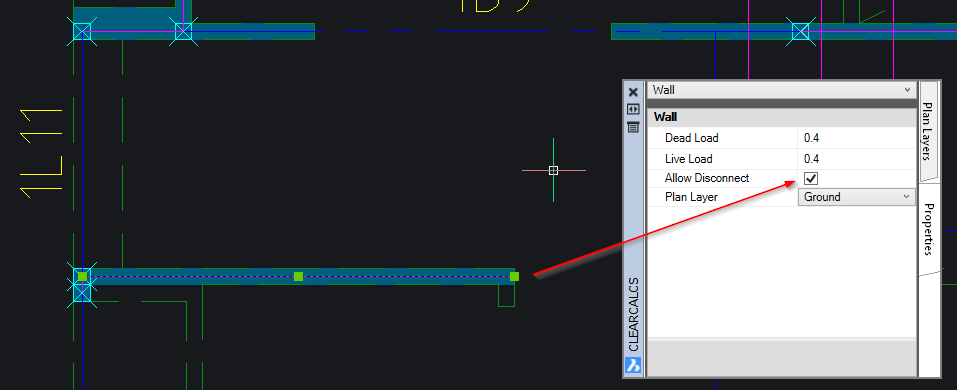 For speed, we suggest that you start in one direction and go around so that the lines all attach correctly – try and avoid any diagonal/non straight beams and walls as this will likely cause errors.
To ensure accurate calculation, please draw beams center-to-center into studs (i.e. not clear span) and ensure the stud is connected.
 After beams are drawn, you can add several adjustments in the properties panel including:
 Once all directions are specified, Show Tributary Areas will display all the load width areas colour coded by the direction the load is travelling.
  Relevant Commands
 b) Create a closed POLYLINE tracing around the edge of the area which will have floor joists travelling in the same direction. Ensure the polyline snaps onto the wall and lintels in place else the floor joists will return errors of not being connected.
Once the entire area has been traced with one unbroken polyline, close the loop by typing ‘c’ and hitting enter.
The POLYLINE should then be selectable (note the dotted pink line in the example below):
 c) Run the HATCH command to get the Hatch popup. Choose ‘user defined’ from the first dropdown menu. Set angle (0 for horizontal, 90 for vertical). Set spacing (in mm) for joist spacing - for example, 450 for 450mm. Click ‘Select Boundary Entities’ and the popup will disappear.
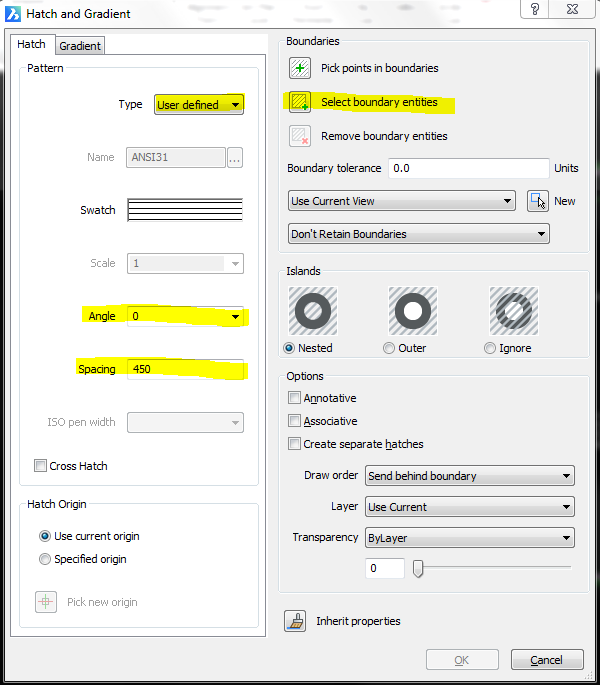 d) Click the POLYLINE we created earlier to denote the Joist area and hit enter - the joists should visually appear and the pop-up will reappear. Change the spacing or angle if it is incorrect, or click ok.
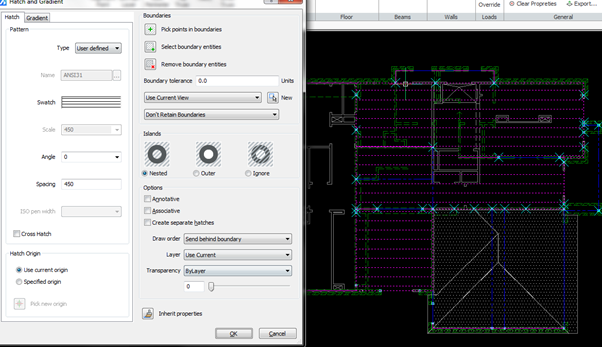 e) Delete or hide the POLYLINE outline if you wish
f) EXPLODE the hatched joist area (Click the block, type EXPLODE, hit enter).
g) Select all of the joists and convert to joists using the Joist button or CC:JOIST. (N.B. These must be Line objects first, you cannot convert the unexploded area).
Specify Floor Voids
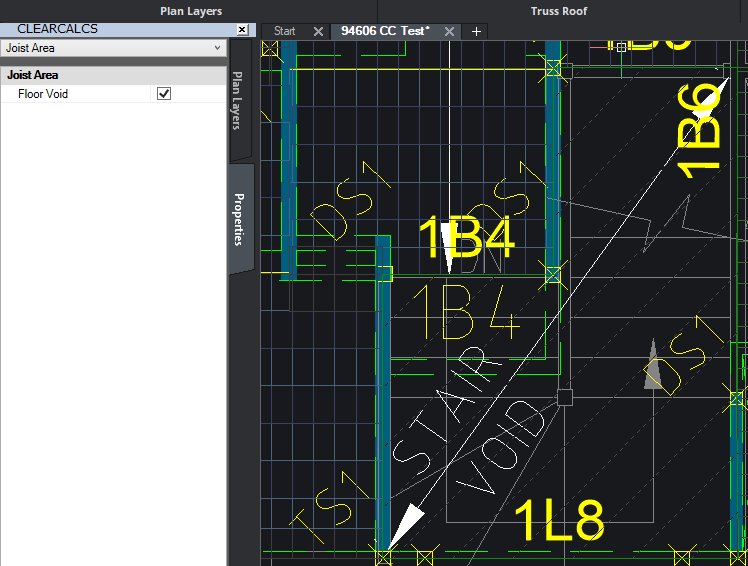
Once you are done drafting the joists you can run CC:VALIDATEFLOOR to ensure everything has been drawn in correctly - any voids in the floor will show up in a red hatch and you will be alerted. To add a stair void, simply click the red hatched area, open the properties panel (CC:PROPS) and tick ‘Floor Void’. The red hatch will be converted to a gray hatch denoting a floor void and the drawing will now pass checks.
 Relevant Commands
🎉 Congratulations! You have successfully drafted your first CalcsCAD project! 🎉
How It Works
The framing tool takes traditional 2D drafting and attaches ‘properties’ to line data so we can identify what is a beam, truss, roof etc. Using this information, we can automatically determine what the loads and supports are for each member, and as a result do the engineering for them. N.B. At the moment, the CalcsCAD plugin only supports trussed roofs. Support for stick framed homes is under development. In order to work, the framing tool requires the user to specify:- Plan layers and alignment points
- Roof perimeter area
- Columns/studs
- All structural beams/lintels, connected by load bearing walls (N.B. Any beams or walls with ‘disconnected’ ends such as interior load bearing walls must have the end line ‘Allow Disconnect’ property ticked in the properties panel)
- All girder trusses (GT), hip trusses, and valleys
- Joist areas (for multi storey homes only)
- Any void locations (ex. stair voids) and area overrides (eg. solar panels, bathrooms)
Using the ClearCalcs CalcsCAD Plugin
The below steps outline how to draft a single or multi-storey dwelling using the CalcsCAD plugin. All of these steps involve drawing or tagging (converting) objects with CalcsCAD properties. As such, we recommend you keep the Properties (CC:PROPS) panel open and docked at all times. While we generally recommend drafting as accurately as possible to ensure no errors arise, the plugin does have a 10mm/0.5in tolerance. |||| |Properties
CC:PROPS|Displays the Properties pop up panel which allows the properties of a given selected object to be viewed and changed. If an object is selected that has no ClearCalcs properties associated, the panel will be blank.|
1. Set Up Plan Layers and Alignment Points
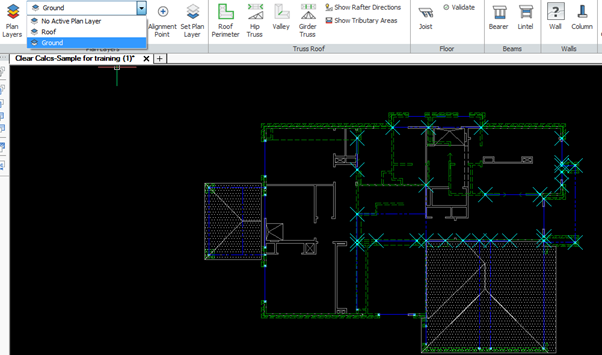
By default, all new drawings will have a single ‘Default’ Plan Layer in the CalcsCAD ribbon which will also be the active layer. It is important to note that Plan Layers are independent of normal CAD drawing layers, so you may still maintain your own company specific CAD layers such as TEXT and DEFPOINTS. If you are drafting a single storey dwelling, you may proceed directly to step 2. If you are drafting a multi-storey dwelling, you will need to set up additional Plan Layers for each level (from top to bottom) and specify an Alignment Point on each layer to ensure the plugin can accurately overlay and align loads travelling down through the structure. Plan Layers All new objects drawn or tagged will be assigned to the active Plan Layer - denoted either by the top dropdown in the Plan Layers panel, or in the Plan Layers pop up. If you tag an object to the incorrect layer, clicking ‘Set Plan Layer’ with the object selected will re-assign it to whichever Plan Layer is currently active. Alignment Points
Alignment points are used by the CalcsCAD plugin to line up the various levels of a multi-storey structure so they sit on top of each other correctly when calculating loads, and to enable our Ghost layer function which allows you to overlay a semi-transparent copy of another level for easy checking.
You must add one Alignment Point per Plan Layer - for example, you may wish to tag the top left corner of each level.
 Relevant Commands
| Ribbon Name | Command / Command Line | Action Taken |
|---|---|---|
 | Plan Layers (CC:PLANLAYERS) | Opens plan layers dialog box where you can add new levels, and change the current active and ghost layer. |
 | Alignment Point (CC:APOINT) | Creates a POINT on the selected plan layer. One per layer is needed for accurate load tracking and ghosting. |
 | Set Plan Layer (CC:SETLAYER) | Assigns the selected object to the current active plan layer. Useful if beams were placed on the wrong layer. |
2. Draw or Convert Roof Perimeter Area
Specifying a Roof Perimeter area allows the CalcsCAD tool to determine all loads transferring from the roof down onto the trusses, columns, and beams in a structure. A Roof Perimeter must be a closed polyline. Please ensure the polyline you draw is closed otherwise the tool will not convert to a roof area. A default truss spacing of 600mm is assumed for each new Roof Perimeter and can be changed in the Properties panel for the selected area. Roof slope is specified later when we upload the end result to ClearCalcs. Most drawings come with the roof area already drawn as a group block in the architectural, but we only want the external roof area, which needs to be a closed polyline. You may use whatever method you wish, but a couple of ways you could achieve this could be:- Use the Roof Perimeter tool to re-draw a new closed polyline over the top
- EXPLODE the original roof outline, PEDIT and JOIN a new closed polyline using only the exterior lines before selecting the new object and running CC:ROOF to convert it.
| Ribbon Name | Command / Command Line | Action Taken |
|---|---|---|
 | Roof (CC:ROOF) | Converts or draws a closed POLYLINE into a Roof Perimeter object. |
3. Draw or Convert All Studs/Columns
We suggest drawing or converting all of the studs and columns for a given Plan Layer after specifying the Roof Perimeter to make it easier to align all subsequently drawn Trusses and Beams on top of these supports. Columns are used to identify cantilevers and supports for trusses and beams. Columns are denoted on the CAD drawing as a POINT. Three possible methods for drawing or converting the columns/studs include:- Using the CC:COLUMN command to manually add each point
- If you have an existing column/stud layer, you can quick select (QSELECT) the appropriate layer which will add all of the objects to the selection then run CC:COLUMN or press the Column button in the ribbon and a Column POINT will be created in the center of each selected object.
- If you have an existing column/stud layer, you can isolate the layer and select all of the column objects before converting them with a single command.
 Columns must be connected to a beam, wall, or truss (i.e. they cannot be on their own). You can select and move a column if needed, or delete if unnecessary.
Tip: You can change the point style (for example, making it look like a X) in your CAD program by typing PSTYLE in AutoCAD or PDMODE in BricsCAD and then specifying the new style you’d like.
Relevant Commands
| Ribbon Name | Command / Command Line | Action Taken |
|---|---|---|
 | Column (CC:COLUMN) | Creates a POINT Column. Can place in center of selected objects for batch creation. |
4. Draw or Convert All Load Bearing Walls and Beams (Lintels and Bearers)
All Lintels, Bearers, and Load Bearing Walls must be drawn in or tagged in order for the plugin to accurately inherit loads and automatically size beams on upload into ClearCalcs. We recommend labelling each tagged Bearer and Lintel in the Properties panel so that they are easy to track once uploaded in ClearCalcs (for example, 1L1). Beams will adopt whatever Plan Layer is currently active when drawn in (for example, Ground Use CC:BEARER, CC:LINTEL, and CC:WALL to draw in all beams and load bearing walls (ignore non load bearing walls). Load bearing walls can be drawn on their own CAD layer that can be hidden later if desired (ex. DEFPOINTS). N.B. If you are converting existing objects, they must be LINE objects, not POLYLINE. The external wall must be one continuous line (otherwise your house would have a hole in it!), however internal load bearing walls and beams can be disconnected. If a line is disconnected, you must select the disconnected segment and tick “Allow Disconnect” in the properties panel.
 For speed, we suggest that you start in one direction and go around so that the lines all attach correctly – try and avoid any diagonal/non straight beams and walls as this will likely cause errors.
To ensure accurate calculation, please draw beams center-to-center into studs (i.e. not clear span) and ensure the stud is connected.
 After beams are drawn, you can add several adjustments in the properties panel including:
- A label (Beam ID) - for example 1L1. This will be used to label the calculation when you upload to ClearCalcs.
- Automatic label toggle - if on, will create a TEXT object with whatever Beam ID you have typed.
- Allow Disconnect toggle - useful for interior beams that are disconnected on one or both ends.
- No Roof Load toggle - tick when you do not wish the lintel or bearer to inherit any roof load or point loads from beams or trusses above.
- Comments - will also be uploaded to ClearCalcs for later reference
| Ribbon Name | Command / Command Line | Action Taken |
|---|---|---|
 | Bearer (CC:BEARER) | Converts or draws a LINE into a Bearer. Properties include label, comments, disconnect flag, and roof load toggle. |
 | Lintel (CC:LINTEL) | Converts or draws a LINE into a Lintel. Can be customized with labels, comments, and load toggles. |
 | Wall (CC:WALL) | Converts or draws a LINE into a load bearing Wall object. Use “Allow Disconnect” for non-contiguous walls. |
5. Draw or Convert All Girder Trusses, Hip Trusses, and Valleys
The CalcsCAD plugin uses Girder and Hip Trusses, as well as any Valleys to infer rafter direction and the loads on each beam and lintel. You may either convert the existing objects if they’re already on the architectural drawing, or you can draw them in using the CalcsCAD commands for each. Once they are drawn in, labels can optionally be added to each via the Properties panel. You can multi-select objects to convert them or change their properties all at once. It is important to note that:- Girder Trusses and Hip Trusses require a minimum of two supports (either columns, beams, load bearing walls, or other Girder Trusses - a truss will automatically use another as a support if the other truss already has >=2 supports. Hip Trusses cannot support a Girder Truss however).
- Hip Trusses must extend from (touch) a Roof Perimeter to a Girder Truss.
- Valleys must extend from (touch) a roof perimeter to at least a load bearing wall or beam.
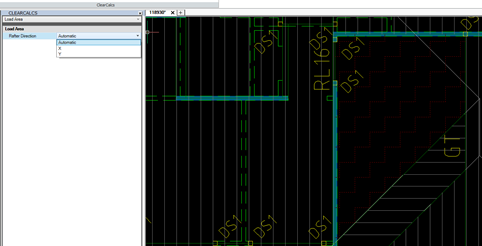
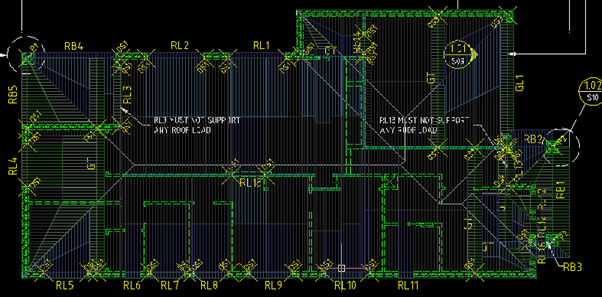
 Once all directions are specified, Show Tributary Areas will display all the load width areas colour coded by the direction the load is travelling.
  Relevant Commands
| Ribbon Name | Command / Command Line | Action Taken |
|---|---|---|
 | Hip Truss (CC:HIP) | Converts or draws a LINE into a Hip Truss object. Needs 2 supports and must touch a Roof Perimeter and Girder Truss. |
 | Valley (CC:VALLEY) | Converts or draws a LINE into a Valley object. |
 | Girder Truss (CC:GT) | Converts or draws a LINE into a Girder Truss object. Must have at least two supports. |
 | Show Rafter Directions (CC:SHOWRAFTERS) | Displays predicted rafter/truss directions. Red hatches show unresolved areas needing manual X/Y direction. |
 | Show Tributary Areas (CC:VALIDATEROOF) | Color codes load tributary areas by direction. Helps verify truss logic and detect connection issues. |
6. Draw or Convert Joists (Multi-Storey Only)
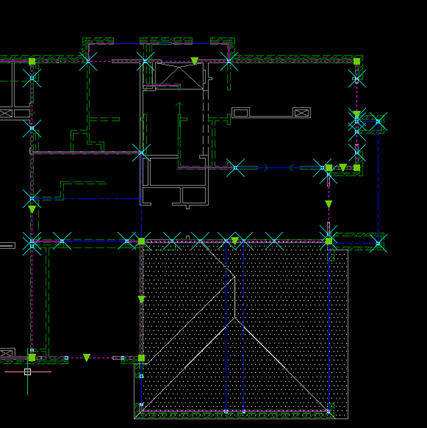
In order to accurately determine floor loads, we need to draw in joists and orient them in the correct directions. Joists must have a minimum of two supports (either beams or load bearing walls). Generate Joists Automatically Coming Soon - You will be able to draw a polyline surrounding each joist area and denote a joist direction and spacing in the properties panel. Create Joists Manually Drawing in joists one by one would be quite time consuming, so we suggest generating them for each joist area using the HATCH or ARRAY commands and then converting these into Joists. To use the HATCH methodology: a) Ensure you are in the correct Plan Layer (ex. Floor) b) Create a closed POLYLINE tracing around the edge of the area which will have floor joists travelling in the same direction. Ensure the polyline snaps onto the wall and lintels in place else the floor joists will return errors of not being connected.
Once the entire area has been traced with one unbroken polyline, close the loop by typing ‘c’ and hitting enter.
The POLYLINE should then be selectable (note the dotted pink line in the example below):
 c) Run the HATCH command to get the Hatch popup. Choose ‘user defined’ from the first dropdown menu. Set angle (0 for horizontal, 90 for vertical). Set spacing (in mm) for joist spacing - for example, 450 for 450mm. Click ‘Select Boundary Entities’ and the popup will disappear.
 d) Click the POLYLINE we created earlier to denote the Joist area and hit enter - the joists should visually appear and the pop-up will reappear. Change the spacing or angle if it is incorrect, or click ok.
 e) Delete or hide the POLYLINE outline if you wish
f) EXPLODE the hatched joist area (Click the block, type EXPLODE, hit enter).
g) Select all of the joists and convert to joists using the Joist button or CC:JOIST. (N.B. These must be Line objects first, you cannot convert the unexploded area).
Specify Floor Voids
Once you are done drafting the joists you can run CC:VALIDATEFLOOR to ensure everything has been drawn in correctly - any voids in the floor will show up in a red hatch and you will be alerted. To add a stair void, simply click the red hatched area, open the properties panel (CC:PROPS) and tick ‘Floor Void’. The red hatch will be converted to a gray hatch denoting a floor void and the drawing will now pass checks.
 Relevant Commands
| Ribbon Name | Command / Command Line | Action Taken |
|---|---|---|
 | Joist (CC:JOIST) | Converts or draws a LINE into a Joist object. |
 | Generate Joists (CC:) | Draws a closed POLYLINE to create a joist area. Direction and spacing set via Properties panel. |
 | Validate (CC:VALIDATEFLOOR) | Checks all joist areas and flags missing joists or unresolved directions (in red hatch). |
7. Add Load Area Overrides
If required add any additional heavier load areas such as bathrooms or solar panels. Relevant Commands:| Ribbon Name | Command / Command Line | Action Taken |
|---|---|---|
 | Area Override (CC:LOADAREA) | Converts or draws a closed POLYLINE into a custom load area (e.g. bathroom, solar). |
8. Export to ClearCalcs + Check and Resolve Errors (Connectivity, Overlap, Truss Directions etc.)
One you’re done drawing, click the ‘Validate All’ button or CC:VALIDATE to double check everything is connected and not overlapping. The debug panel will say “Drawing is Valid” if no issues are found. Once you are happy with the drawing, run ‘Export’ (CC:EXPORT) to generate a .ccframe file ready for upload to ClearCalcs. This command will run Validate All prior to exporting and warn if there are any errors that need to be addressed first. N.B. If you are working on a multi-storey structure you should ensure you have created a Plan Layer for each level tagged all objects to the appropriate Plan Layer they belong to. Relevant Commands| Ribbon Name | Command / Command Line | Action Taken |
|---|---|---|
 | Properties (CC:PROPS) | Opens Properties panel for selected object. Blank if no ClearCalcs properties are found. |
 | Highlight Tagged (CC:HIGHLIGHT) | Highlights in purple all objects with ClearCalcs tags—useful for coverage checks. |
 | Hide Output (CC:HIDE) | Hides currently active visual commands (e.g. tagged highlights, rafter lines). |
 | Validate All (CC:VALIDATE) | Checks full drawing for errors and zooms to problem areas in order. |
 | Clear Properties (CC:CLEAR) | Clears all ClearCalcs tags from selected objects—useful to undo incorrect tagging. |
 | Export (CC:EXPORT) | Exports drawing as a CCFRAME file. Flags errors before export is allowed. |


